Tuesday, December 22, 2009

Crispy-coated Chicken

I love fried chicken. There I said it. In it's ideal incarnation, it's crispy on the outside, juicy on the inside, flavourful and spicy and just plain delicious, both hot and cold. What if you could have it be all those things...and healthy too?

There are lots of good reasons to avoid deep-frying, or shallow-frying for that matter. The biggie of course is health; that's a lot of extra fat no one really needs. There are other reasons too; it's messy, heating that much oil is hazardous, over time it coats your kitchen with a gross oil-haze that is difficult to clean, buying that much fresh oil is expensive but re-using old oil is disgusting...so yeah a pretty good argument can be made against it. The one thing in favour is the way it cooks food when done right - it seals in the flavour and moisture while creating a crisp outer shell. This chicken is all that and more - it's low-fat! Ahhhh I can hear my unclogged arteries thanking me, and my tastebuds taking up the chorus!

Crispy-coated chicken

As this recipe is more about technique than a perfect balance of ingredients, I am going to just approximate amounts, and you can "wing it" when it comes to creating your own blend, haha.

I like to use boneless skinless chicken thighs, they have great flavour and stay moist much longer than breast meat, which is important if you want a really crisp outer layer. They are richer in iron and other nutrients, and not significantly higher in fat, despite the bad rap they get.

Coat chicken peices first in an egg white beaten together with some dijon mustard. Then coat in crumbs; I use a mixture of Nature's Path Mesa Sunrise cereal crushed in the blender, a spoon of flour, season salt, pepper, cayenne pepper, chili powder and garlic powder. I like it heavy on the pepper.

Spray your baking sheet with cooking spray before laying the chicken on it. Then spray the tops of the coated chicken peices.

Bake at 400F until the peices are cooked through, browned and crispy. How long this takes depends on the size of your peices; usually from 25-35 minutes.

You will love this chicken. Anyone you feed it to will love you for it. And, most importantly, you will love me for giving you the idea.

Yay chicken!

Nutritional info: well it totally depends on the size of the thighs...more generous-figured chickens run about 100g per thigh (raw), while the skinny-minnies can be around 50g. So counting for 200g of raw chicken thigh meat, or two gorgeously large thighs per portion, the values are: 298cals, 9g of fat, 43g protein, 7.8g carbs, 1g fibre, 600g sodium.


Monday, December 21, 2009

Moroccan Soup


Yep another soup...after all, I am the self-dubbed Soup Queen!

I was at work one day when a most delicious smell came wafting through the kitchen, across the hall and into my office. I followed it like Pepe La Pue floating along the scent-breeze of his true love. Once the source was found, I bullied the cook into giving me the recipe (well actually she gave it over quite willingly, she's a very nice lady). With some minor adjustments to the recipe, here is the way to drive your friends, family, or coworkers crazy with soup-lust:

Moroccan Soup

Sautee in 1 tsp olive oil 2 cloves of minced garlic, 1" piece of minced fresh ginger, 1 large chopped onion, 1/4 teaspoon cinnamon and 2 tsp cumin approx 5 minutes.

Add two chopped carrots and 2 ribs of chopped celery, sautee a few minutes longer.

Add 6 cups of low-sodium vegetable or chicken stock, 3 cups of water, 28z can of tomatoes and 1 cup of rinsed dried green lentils. Bring to a boil, reduce heat and simmer 20 minutes.

Add 19 0z can of chick peas or 1 1/4C cooked chick peas, cook 15 minutes longer.

Add 1 teaspoon of lemon juice, 1 Tbsp harissa or sambal olek (chili paste) and lots of chopped cilantro and enjoy! Makes about 13 cups of soup.

Nutritional info: Each cup of soup has 80 calories, 1g fat, 4g protein, 15g carbs, 4g fibre, 360mg sodium.

Variation: Add 1C chopped grilled chicken breast and you have a great meal.

Thursday, December 10, 2009

Creamy Mushroom Soup


Soup: Warms the belly and soothes the soul!

I have great associations with mushroom soup. My mom made it for us as kids; I remember steaming bowls of Campbell's Cream of Mushroom for winter lunches. Later, as a teenager, it was the only thing that satisfied the late-night post-party hungries. How many times did my best friend and I tiptoe into the kitchen after midnight, stifling giggles as we heated soup and searched for crackers? Too many to count.

I am not all that interested in the tinned variety anymore (though I confess, a can or two of the low-fat condensed Campbell's can usually be found in my cupboard, waiting to be called into service for a shortcut dinner). And yeah I don't claim to have unerringly sophisticated taste buds - I can still appreciate a wedge of Velveeta just as much as brie. But when it comes to cream of mushroom soup, this grown-up version is so delicious, it's not even in the same stratosphere as the canned stuff. And adapted to be low-fat, too! The skim milk powder adds richness without the fat; the sherry adds a new dimension of flavour to balance the creaminess. It's satisfying and earthy and you should really make it.

Creamy Mushroom Soup for Two

1/3C dried mushrooms
1C chicken stock
4 large white mushrooms, chopped
1/4C shallots, minced
1 clove garlic, minced
2 Tbsp flour (I like the gluten-free garbonzo bean flour, but any is fine)
1C low-fat milk (1%)
1 Tbsp skim milk powder
1/4 tsp dried italian herbs or herbs de provence
1/4C dry sherry or red wine
cracked black pepper
sea salt
1/4C italian parsley, finely chopped

Microwave the chicken stock in a glass bowl and when it's boiling, remove and crumble in the dried mushrooms. Steep until ready to use.In a large non-stick saucepan, spray the bottom with cooking spray or add a touch of olive oil and heat on medium. Add in shallot, chopped mushrooms, and garlic and saute until lightly browned.Add in a few rablespoons of the mushroom liquid. Before it's completely absorbed (gotta pick up the pace here), sprinkle in the flour and mix around well. Cook for about one minute, then gradually add in all the mushrooms and liquid while constantly stirring.Don't just dump it all in or you'll get lumps; you want to add the liquid a little at a time at first. Slow, then fast. Got it?

Dissolve the milk powder in the milk. Add to pot, along with herbs, and bring to a simmer. Simmer gently for 10 minutes, adding the sherry or wine after 5. Add cracked pepper and salt to taste, if you are fancy like me you will have some nice pink peppercorns to crush and thrown in there as well. Remove from heat and stir in parsley. Thin with a little water if it's too thick ( I usually add about 1/4C or so). Done and done! See, yummy AND low-fat AND easy. Ahhhhh!

Nutritional info: Half the recipe is 127 calories, 1.4g fat, 12g protein, 16g carbs, .5g fibre, 415mg sodium.

Wednesday, December 9, 2009

Biscotti: A Trio for the Holidays


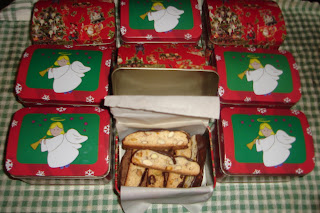
I came up with Project Biscotti as a means of sending good will to some colleagues, as well as getting in some Christmas baking without having the results hanging around to tempt me. I settled on biscotti because they travel well, won't go stale for a long time, and hey everyone loves things to dip into coffee! I made a plan to bake three kinds of biscotti and send little presents of them to folks I work with on a couple of projects. The tidy tins of yummy treats are all lined up, ready to head to locations all over the province.

Biscotti are, by nature, crunchy. The recipe I based mine on was low-fat, meaning no butter and using only egg whites. This made an uber-crunchy biscotti...I ended up using whole eggs because I dislike wasting egg yolks, and the results were actually better. Even coated in chocolate, the cookies are just 80 calories each, so I won't begrudge them a few egg yolks!

I went a little crazy and made my own candied orange peel for them, so I've included that recipe at the bottom. I had a lot of fun with Project Biscotti....and aren't they cute?

Basic Biscotti recipe
modified from The New Best Recipe:
2C flour
1 tsp baking powder
1/4 tsp salt
1C sugar
3 extra-large eggs
1 tsp vanilla
1/4 tsp almond extract
1/2 tsp cinnamon
1/4 tsp nutmeg
Combine flour, baking powder, and salt in a large bowl. In a separate bowl, whisk together remaining ingredients until light yellow. Pour into dry ingredients, and mix until just combined. The dough should be very wet and sticky.


For Candied Orange Peel, Almond, and Dark Chocolate Biscotti:
Fold in 1/3C chopped candied orange peel and 1/3C roasted almonds.
For Cranberry, Pistachio, and Dark Chocolate Biscotti:
Fold in 1/3C craisins and 1/3C pistachios
For Double Chocolate Almond Biscotti:
Use 1/4C less flour and replace with 1/4C cocoa. Fold in 1/3C toasted almonds.

Form each batch into two logs, about 3" wide, 13" long, and 1" tall. Bake at 350F for 25 minutes. Remove from oven, lower oven temperature to 325F and allow the logs to cool for about 5 minutes. Cut into 3/4" slices and lay flat on the baking sheet. Bake for 30 minutes, turning once (or if you want to avoid turning them, bake the slices standing up.)
Cool biscotti on baking sheet. Meanwhile, heat some bittersweet chocolate in a small pot (I just put mine on the element that vents the oven and it gently warms the chocolate as the oven cools, no need for fancy double-boiler here!). I use 3 baking squares per batch, being moderately stingy with the chocolate coating....not as thin as a summer coat but not a thick winter one either, I guess more like a light fall coat. Just dip the tops into the chocolate and push the excess off with a spoon.


And whatever you do, don't fall asleep on the couch watching CSI while you are doing the second baking. That makes for VERY crunchy biscotti. Not that I know about that.
Yield: 36 biscotti per batch
Nutritional info: Each cookie has 81 calories, 3g fat, 2g protein, 13g carbs, 1g fibre, 16 mg sodium.


Candied Orange Peel:
This is a bit laborious but totally worth it.
2 thick-skinned oranges (like valencias)
1C sugar
1/4C water
Score orange skin into six or eight segments and peel off orange. Reserve orange flesh for other use. Place peels in a pot and fill with cold water. Bring to a boil on high heat and drain. Repeat this process two more times.
Cut orange peel segments into thin strips. Bring sugar and water to a boil over medium heat, and let simmer for 8 minutes, or until it starts turning light brown. Add in orange peels and cook for another 5 minutes or so, until the sugar has absorbed into the orange peels. Remove from heat and place orange peels individually on a rack or plate to dry. Coat each one with sugar if you like, but I like them plain. If you leave them in a big heap, you will have one SUPER-ORANGE PEEL. Not as pretty, but just as tasty.

Thursday, December 3, 2009

Pita Pizza


Ah pizza, the Food of Gods.

When I decided to lose weight, I was so sad about losing pizza - until I realized that was completely unnecessary. The cheesy, saucy, crispy-crusted deliciousness you see above is an unbelievable 400 calories. I first experimented with pita pizza out of desperation, but soon discovered it can actually be even yummier than take-out and certainly yummier than store-bought types. My version uses tomato paste for sauce which gives a powerful kick of flavour, and low-fat cheeses that not only reduce the fat grams but also provide a cleaner tasting, un-greasy final product. The single tablespoon of parmesan gives a nice sharp finish, since the low-fat cheeses can be a bit bland alone. And my spreadsheet does not lie, this entire thing isn't even a full meal's worth of calories.

I still indulge in a good restaurant wood-fired pizza once in a while...but rarely. My own is just too good to bother with other higher-calorie kinds. I make a basic pizza dough crust if I am feeling ambitious, but the pitas from the grocery store work great. The thin pocket-style ones I get are 140 calories each and come in whole wheat, but the kind I prefer is a greek-style pita, almost a flatbread, by a company called Pita Delight . If you can find these, they are the best for pizza! Slightly higher in calories at 200, but when you are looking at an overall total of 400, who cares. Whatever pita you use, just read the label to make sure it's not one of those crazy super-high-calories ones, they are out there.
I accompanied this cheesy beast with a big pile of broccoli sprinkled with leftover parmesan, and a slice of pork loin for added protein.

Now when I hear people who are on diets lament about how much they miss pizza, I feel sorry for them....because they don't know any better! Seriously, make a pita pizza and quit yer bellyaching!!

Pita Pizza
for each pizza:

1 pita, preferably Pita Delight
1 Tbsp tomato paste
1/4 tsp oregano
1/8 tsp cayenne
s&p
45g low-fat mozzerella (15% m.f.)
15g low-fat old cheddar
1 Tbsp finely grated good parmesan (no Kraft shakers here, people!)
1 mushroom

Prepare the sauce: Mix the tomato paste with the spices and a tiny bit of water to thin out to a pizza-sauce consistency. Spread over the pita.

Grate cheddar and mozza, combine and sprinkle evenly over sauce. Sprinkle a bit of parm over top, then place mushrooms lovingly and top with remaining parm.

Turn on oven or toaster oven to 400F and place pita pizza on a baking sheet inside (don't bother to preheat, the extra blast of heat from the elements warming gives a nice crispy crust). Bake until golden brown on top, about 20 minutes. I am guessing at the time...I never remember to look, grr. But you'll know when it's done....oh, you'll know.

Nutritional info: 400 calories, 15g of fat, 28g protein, 38g carbs, 3.5g fibre, 900 mg sodium.

You could also add some turkey pepperoni or ham for an additional 50 calories or so. Or load it up with delicious veggies like thin-sliced red peppers, onions, marinated artichoke hearts, even zuchinni (but make sure it goes on top of most of the cheese or you will end up with too much moisture and have pizza mush). Or add zing with cured black olives or sundried tomatoes. Or go nuts and add some rendered bacon peices, woo hoo! Even with BACON you can keep it under 500. Insane!

Tuesday, November 24, 2009

No-knead bread

My relationship with bread-making has been rocky at best. Any bread attempts were hit or miss, more often misses. For the longest time I was convinced that my biologocal make up was somehow detrimetal to bread rising, I could not make dough rise to save my life. Then, with the assistance of a bread machine and some strong encouragement from the boyfriend and instruction from his mother, I successfully made bread. Woo hoo! Full of new confidence, I have begun to experiment with bread made the old-fashioned way, and found success with that too. Who knew?! Like succeeding at anything, it has taken patience and persistence and flexibility. A life lesson in bread.

I found this recipe just yesterday and wanted to try it immediately. It uses science to make the best bread ever! You see, bread dough develops a good texture when the gluten molecules are aligned. You can make that happen by kneading it to develop the gluten, or you can - this is where it gets technical - you can let it sit for a long time. The trick is to make a very wet dough, as the molecules need wetness to move around in more easily and align themselves, like good little soldiers all in rows. The dough rises for 18 hours to start with, then another 3 after you shape the loaf. And it's cooked in an enclosed dish, something about needing the steam to make it crust over well. More science. I am not totally sure about WHY it works, but wow did it ever make an awesome loaf!! Science rocks!

The taste is excellent, likely because the dough has so much time to develop, and the texture is much like a professional artisan loaf. Now just to figure out how to store it without it either drying up or getting soggy....and how to stop eating at one slice!
No-knead Bread
adapted from Jim Lahey, Sullivan Street Bakery
2 C multigrain bread flour
1 C all-purpose flour
1/4 tsp instant yeast
1 1/4 tsp kosher salt
1 5/8 C water
In a large bowl combine flour, yeast and salt. Add water and stir until blended; dough will be sticky and shaggy. Cover bowl with plastic wrap and let sit for 18 hours at room temperature (I did mine before bed then came back to it the next day after work).
Dough is ready when surface is dotted with bubbles. Turn dough out onto a floured work surface and fold it over on itself a few times. Cover loosely with plastic wrap and let rest for 15 minutes.
Using just enough flour to keep dough from sticking, gently shape into a ball. Mine was way to soft and sticky to form a ball, it was more like The Blob. Shift it onto a floured peice of parchment paper, seam side down, and cover with a floured tea towl. Let it rise for another 3 hours; it might double in size or it might not. Mine didn't but it was closing time in Sherylyn's Kitchen so I turned on the oven to 450 and moved things along anyway.
Put a large covered pot in the oven (cast iron, pyrex, enamel, or ceramic, whatever you've got that's oven safe) ad let it heat up with the oven. Carefully remove hot pot fropm the oven. Do not forget that the lid heats up too; remove the hot lid, preferably with pot holders or some other protective gear. Turn the dough over into the pot, seam side up, and shake it a bit to distribute evenly. It might look a mess but that's ok. Cover with the lid and bake for 25 minutes. Remove the lid and bake for 15 to 20 minutes more, until loaf is nicely browned.
Now, as much as it might pain you, do not cut into loaf immediately. Let it rest for a bit and allow it to de-steamify before slicing with a bread knife...I can never wait too long before sampling!
Nutritional info: Because there's no sugar or fat on the recipe, it's lower in calories per gram than most breads. Per 50g slice (about 1/15 of loaf), it's 80 calories, 0g fat, 3g protein, 17g carbs, 2g fibre, and 194g sodium.

Thursday, November 19, 2009

Caesar salad


Hail Caesar! Forger that, hail Sherylyn for inventing the most awesomest Caesar salad ever, and low-cal to boot! Actually I have Astro to thank for making such amazing, versatile Biobest yogurt. That yogurt makes me feel like a kitchen goddess!


Sherylyn's Awesome Caesar Salad

Dressing:
1/4C Astro Biobest 1% yogurt (or some other not as good thickener-free yogurt, but you will be sorry)
1T low-fat mayo (I like Hellman's half-fat olive oil mayo)
2T red wine vinegar
2 tsp worchestershire
2 tsp dijon mustard
1 tsp anchovy paste
1 clove garlic, pressed
cracked pepper

Put all ingredients in a bowl and whisk until combined. Refrigerate until ready to use.

"Bacon" bits:
Finely chop 100g of low-fat ham (about 2 slices). Put the bits in a frying pan coated with cooking spray, and sautee on medium heat until browned and they start to pop like popcorn. You might need to cover if they start popping before they are fully browned.

Croutons:
Cube 2 slices of multigrain bread (or gluten-free bread for you GF people). Spray cubes with cooking spray, toss with some italian herbs and cayenne pepper, spread on a baking sheet and bake at 350F until crisp and brown, about 15 minutes - WATCH them, they burn suddenly!

Assemble: In a large bowl, toss a washed and torn head of romaine, dressing, ham bits, croutons, and about 1/4C of grated parmesan cheese until lettuce is well-coated. Done!

This makes a large salad that serves 4 people as a side-salad or two large dinner-salads.

Nutritional values for 1/4 of recipe: 116 calories, 4g fat, 10g protein, 9g carbs, 1.3g fibre, 550mg sodium.

Tuesday, November 17, 2009

Solyanka: Ukranian Soup


Who knew there was another Ukranian soup besides borscht? I have been Ukranian all my life and just found out about this soup last Friday. A visit to a Ukranian restaurant and an adventurous boyfriend yielded this new treasure - I never would have ordered this myself (pickles in soup?!) but it was a revelation. It's richly flavoured, hearty stick-to-your ribs kind of fare yet only 87 calories per cup (after some Sherylyn-ifying). Perfect comfort food in this gray, drizzly weather! I used a combination of red and yellow beets, but next time I would just use yellow. The one red beet in there coloured everything bright red. Show off.

Solyanka

250g low-fat ham, 1/2" cubes
150g turkey kolbassa, 1/2" cubes
1 tsp olive oil
1 medium potato, 1/2" cubes
3 medium beets, preferably yellow, 1/2" cubes
1C chopped onion
4C shredded cabbage
1L low-sodium chicken broth
1L water
1 can crushed tomatoes
4 medium-sized dill pickles, halved and sliced, plus 1/4C brine
1T capers
1T dried dill or 2T fresh

Put a large pot over high heat and add chicken broth, water, tomatoes, pickles, brine, capers, potato and beets. Heat to boiling, then turn heat to medium and simmer for 20 minutes.
In the meantime, heat oil in a large skillet and sautee onion, ham, and kolbassa until lightly browned. Add the ham mixture, dill and the shredded cabbage to the broth and comtinue to simmer for another 30 minutes, until vegetables are soft.

Serve with a dollop of low-fat plain yogurt and chopped fresh dill. Easy peasy, and so satisfying!

Nutritional info per cup: 87 calories, 1.6g of fat, 7g protein, 12g carbs, 2.3g fibre, 636mg sodium.

Sherylyn's tip of the day: How to remove beets stains from clothing: Roll item in question into a tight ball. Shove angrily into a garbage bag and toss. Heh just kidding, my mom is really good at removing stains so I'd just give it to her. The rest of you are on your own.

Thursday, November 12, 2009

Oaty Banana Blueberry Muffins


It was really hard to pick which ingredients were the most compelling for the title of this muffin recipe. They all seem equally important and exciting to me, but Oatmeal-Whole Wheat Flour-Bran-Flax meal-Applesauce-Blueberry-Banana Muffins seemed a bit unwieldy. My awesome boyfriend's mom (or is that "boyfriend's awesome mom"? Hmm both) shared this recipe with me, and I only changed it a little, as I am wont to do. Best muffins EVER. I declared them Heaven Muffins when she served them to us. I would have just called them that, but I really like the word Oaty (sounds like goaty, heh) and Oaty Heaven Muffins just sounds wrong. Anyway, they are filled with all things good for you, and are a fraction of the calories of a regular muffin. Enjoy!

Oaty Banana Blueberry Muffins

1 1/4C whole wheat flour
1C wild oats
1C wheat bran
2T flax meal
1/2C Demerara sugar
1 tsp baking powder
3/4 tsp baking soda
1 tsp cinnamon
1/4 tsp salt
1C blueberries (frozen or fresh)

Combine all that stuff in a big bowl. Then in another bowl, mix together:

1C applesauce (no sugar added)
1/2C skim milk
1T olive oil
1T corn syrup
1 large egg
1 large banana, mashed

Once it is well-combined, add the wet mixture to the dry mixture and mix until just incorprated. DO NOT OVERMIX. Every time you overmix a kitten dies.

Spray a muffin tin with cooking spray or line with paper muffin cups (or if you are fancy like me, line with silicone muffin liners). Divide the batter amongst the 12 cups, they will be heaping full. You can also make 24 smaller mini-muffins. Or one big loaf. Or eat the batter straight from the bowl while watching reruns of Friends, whatever.

Cook in a 375F oven for 18 minutes or until they spring back when you touch them lightly.

Nutritional values per muffin: 169 calories, 3g fat, 5g protein, 34g carbs, 5g fibre,

Mini-quiches: the perfect breakfast


I LOVE these mini-quiches. The recipe is adapted from one in Cooking Light magazine; often I find their recipes don't go far enough to make something low-cal (though I do appreciate that they don't go the fake-sugar route). But this recipe was an epiphany! Using low-fat cottage cheese in the quiche gives it a creamy, cheesy taste and texture without adding a ton of high-fat cheese. It's brilliant. And I don't often say that in reference to something I didn't myself come up with ;).


Ham, Swiss and Spinach Mini-Quiches

200g cubed low-fat ham (about 1.5C)
1/2C chopped onion
1/8 tsp fresh ground pepper
75g reduced-fat swiss cheese, shredded (scant 3/4C)
1C fresh baby spinach leaves
1C low-fat cottage cheese (1%m.f.)
1/2C 1% milk
2 large eggs
2 large egg whites
1/4C flour (any flour, but ideally garbonzo bean flour)
1 tsp baking powder
1T finely grated parmesan cheese

Heat a large non-stick skillet over medium-high heat. Coat with cooking spray and add ham, onions, and pepper. Saute until ham and onions are slightly browned, about 10 minutes. Set aside to cool.

Coat a muffin tin with cooking spray and sprinkle a bit of the grated swiss cheese in each cup, using 1/4C in total. Divide ham mixture between cups. Top with spinach leaves.

Combine remaining swiss cheese, cottage cheese, milk, eggs, flour, and baking powder in a large bowl and whisk until your arm is sore. Unless you have guns like Sheila, in which case just beat for a minute or so. Divide mixture amongst cups. The spinach leaves will not want to let the mixture underneath; do not oblige them. Poke them down as you go, be firm with them as they like to misbehave and if you have too much spinach sticking out of the egg mixture it will dry up in the oven and get all crunchy. This seems like an unnecessarily laborious step but trust me, the results are way better than if you just chop the spinach up small and mix it in. Once you have poked all the spinach and mixture into submission, top with a sprinkling of parmesan and cook in a 350F oven for 40 minutes or until golden brown on top.

One of these little beauties is just 86 calories, 3g fat, 11g protein, 4g carbs and 325mg sodium. No fibre of note but hey you can't have everything. Eat a banana or better yet, a kiwi with the skin on. That's right!
Sherylyn's tip of the day is kiwi skin has loads of excellent fibre so wash your kiwi thoroughly, slice thin and eat it down. It's actually really yummy!

Vegetarian Option: Replace the ham with some chopped mushrooms and/ or bell peppers and sauté with the onions. Sauté well to get the moisture out, otherwise you will risk a soggy quiche!

Thursday, October 8, 2009

Baked Falafels with tahini-yogurt sauce


Last week I had some terrible falafels at shawarma shop, and thought of how far they were from the delicious, bright green spicy morsels I remember from Saudi Arabia. It's not something I usually order anyway, since they are typically deep-fried. So I decided to go on a falafel quest....I scoured the internet for recipes, advice, and guidance. Armed with some new knowledge, I hit the kitchen. Here is my version....I think they turned out very delicious! Next time I will make them with the green fava beans that are traditional in Arabian falafels.


Baked Falafels with Tahini-Yogurt Sauce

1 1/4 C cooked garbonzo beans (or 1 can)
3 cloves garlic
1 handful parsley
1 handful cilantro
2 green onions, chopped
1/2 tsp cumin
1 chili pepper
1 tsp tahini paste
2 grinds each of salt and pepper
2 Tbsp water
1 Tbsp flour (ideally garbonzo bean flour)

Pulse all the ingredients except the flour in a food processor until mixture resembles a coarse meal and the herbs have turned the mixture green. Transfer into a bowl and add the flour, stirring well until combined. Form into 8 balls (about 2 Tbsp mixture for each), and flatten to form a disc. Spray a baking sheet with olive oil cooking spray, place falafels on the sheet, and spray them with cooking spray. Bake at 375F for 30 minutes, turing once, or until golden brown.
Each falafel is 48 calories, 0.6g fat, 2.3g protein, 8g carbs, 1.6g fibre, and 10mg sodium.

Sauce:

1/2C yogurt
2 green onions, finely chopped
1 tsp tahini paste
s&p

Combine all ingredients in a bowl, chill until ready to use.

Wednesday, October 7, 2009

Brussels Sprouts a l'orange


In honour of the approaching Thanksgiving holiday, I am posting my recipe for Brussels sprouts. Now, I was never a big fan of the Sprout, but a certain French cook transformed me from a girl who would risk choking to death in an attempt to swallow one of the little suckers whole, rather than chew (I had parents who made us always eat our veggies!) into a Sprout-loving maniac. Yes, maniac! The cook was my ex's sister....we didn't have much in common but the woman knew her way around a Sprout. My recipe doesn't much resemble hers, but I learned technique from her, and that Brussels sprouts don't have to be mushy yuck...they can be tender yet crisp, green little lovelies with a delicately earthy flavour and sweetness that tastes like more. Yum!

Brussels Sprouts a L'orange

Per pound of sprouts, you will need 1 orange, 2 tsp Grand Marnier, and 2 tsp butter. The oranges should be juiced and zested.

You must have fresh, not frozen sprouts, if you can get them still on the stalk and cut them off yourself, even better. Clean and trim them, cut each one in half and cut a little slit in the core end of each half, like so:

Heat a large frypan on medium-high heat and coat with cooking spray. Throw in the sprouts and cook for a few minutes, stirring occasionally, until you see them browning a bit. Then put in the Grand Marnier and let it evaporate. When it is mostly evaporated, put in the orange juice and zest, stir it all up and put a lid on it. Let the sprouts steam in the juice for about 3 minutes, really it depends on the size...small sprouts need very little time, larger ones will need a bit more and may requuire a splash of water to keep the steaming going longer...just try them as you go, they should be fork-tender but still bright green and have some crispness to bite. The liquid should be all evaporated by the time they are done, at this point put in the butter, some cracked pepper and sea salt, and toss to coat.

Monday, September 28, 2009

Six-Pepper Hummus and Pita Chips

Inspired by Sheila's request, I am posting my recipe for Six Pepper Hummus. It's super-yummy, made with naturally heathly indredients, and a little less calorie-dense than regular hummus due to the addition of pureed peppers.

Six-Pepper Hummus

-1.5 C cooked garbonzo beans ( I soak some beans overnight then cook them until tender, but I can't tell you how much dry beans you need to make 1.5C cooked, or how long to cook them, so if you are not into Kitchen Gambling you can use the canned ones, drained and rinsed).
-1/4C cooking liquid or liquid from can
-1 large red sweet pepper
-assortment of 5 medium-hot peppers (I used crimson hot, red jalepeno, pimento, banana, and an unidentified red curly one, you can use whatever is available at your grocery except habanero, I don't recommend that one unless you like it REALLY hot)
-2T olive oil
-1T tahini paste
-juice of 1/2 lemon
-1/4tsp cumin


Roast the peppers in a baking dish in a 400F oven until the skins have blackened. Cool slightly, peel off the skins (easier if you seal in a plastic bag while cooling). Scrape out innards and deposit the flesh into a blender or food processor. Add in the cooked beans and the remainer of ingredients. Blend on high for two minutes, should be quite smooth and a little emulsified. Add salt and pepper to taste, pulsing to distribute. Put into a bowl, sprinkle a little paprika on top and decorate with a sprig of parsley. Chill and serve with pita chips.

Where do I get some good, preservative-free, low-sodium pita chips you ask? Whip up a batch yourself, it's easy!
*The hummus is gluten-free, but the chips, clearly, are not.

Pita Chips

-1 bag of whole wheat pitas (pocketed kind, not greek)
-olive oil cooking spray
-cayenne pepper, s&p, dried italian herbs of herb de provence, cumin

Cut pitas in half and split along edges to get four half-moons. Spray both sides of each half-moon lightly with cooking spray, and sprinkle with your choice of herbs and spices, very lightly (flavour will concentrate). Place in a single layer on a cookie sheet and bake in a 350F oven until lightly browned. Warning! They go from perfect to inedibly burnt very quickly, so you must watch them closely. It takes about 10 minutes in my oven but could take less or more, depending on your oven, the thickness and moisture content of your pita bread, and the alignment of the planets. I usually burn at least one batch, so it's best to be prepared with extra pitas.

Nutritional Info per 1/3C: 107 cals, 7g fat, 3g protein, 9g carbs, 2g fibre

Tuesday, August 25, 2009

Sherylyn’s Amazing I-Can’t-Believe-it’s-Reduced-Calories Frozen Peanut Butter Fudge Pie

It may be a bit iffy to call this recipe "healthy", due to the inclusion of some fat-free Cool Whip (what is that stuff anyway???), but people who are watching their calories can enjoy this low-cal treat and not break the calorie bank, so to speak. It's been very popular whenever I have made it, with both dieters and non-dieters, as it's so delicious and rich-tasting!

Sherylyn’s Amazing I-Can’t-Believe-it’s-Reduced-Calories Frozen Peanut Butter Fudge Pie
(the name’s a bit wordy, you think?)

*Before you start, even the night before, put a cup of yogurt to drain...it should drain at least 2 hours but as long as overnight is ok. I just line a strainer with a coffee filter or paper towel and suspend it over a bowl, and put in the fridge just like that. The best yogurt for this, IMO, is Astro BioBest 1% plain yogurt in the blue container.

First prepare the fudge:
1/4C raw sugar
3T cocoa, sifted
1T cornstarch
1/4C water
2T skim milk powder (or replace water and skim milk powder with 1/4C evaporated milk)
1/2tsp vanilla

Whisk all ingredients together in a small pot. Bring to a boil on medium-low heat, stirring often. Simmer for about a minute, should be thickened at this point, remove from heat. Cool completely (I transfer into a bowl and put in the fridge to hurry it along).

Next prepare the crust:
120g chocolate graham bears or bunnies
1T ground flax seeds (optional)
Egg white

Grind up the bears or bunnies in the blender (ignore the screaming). Dump into a large bowl, add flax. In a separate bowl, lightly beat the egg white. Add about half of it to the crumbs and work in with your fingers to incorporate completely. The mixture should still be crumbly but should stick together when squeezed. Add a bit more egg white if it’s too dry, be careful not to add too much, it should not be wet. Spray a pie plate well with cooking spray. Dump in the crumb mixture, distribute evenly, and press onto bottom and sides of pie plate. Bake at 375F for 10 minutes. Cool.

Then make the filling:
7 Tbsp drained yogurt
1/2C (half a small tub) reduced-fat cream cheese
5 Tbsp condensed non-fat milk (the sweetened kind)
6 Tbsp reduced-fat peanut butter
4 tsp lemon juice
1 tsp vanilla
3 C 95% fat-free Cool Whip (it comes frozen so defrost in the fridge before using)

In a large bowl or mixer, beat the cream cheese for a minute. Add in the condensed milk and beat again. Add in the peanut butter and beat again, until smooth. Stir in the lemon juice and vanilla. Fold in the Cool Whip gently, you want it completely incorporated but not deflated.

Then assemble!
Using half the fudge, dab over the bottom of the baked pie crust, smoothing carefully (if you are rough the crust will break up). Pour in the filling, smooth the top. Using a spoon, drip the rest of the fudge over the top in a lattice pattern or however you want. Freeze for at least 4 hours. Enjoy!

Nutritional values: 1/12 of pie is 194 calories, 7g fat, 4.8g protein, 29g carbohydrate, 1.4g fibre, 144 mg sodium.

My virgin voyage!

Well it took me long enough. I've resisted the whole blogging phenomenon because it seemed too modern-communicationy for my taste, but I think maybe resistance is futile. I love journaling, and also need a good place to store and have easy access to my emerging library of recipes, so why not have this do both.

A little about me:

I've been on a journey of self-improvement and weight-loss for a couple of years now. The self-improvement part started first; the weight-loss seemed a natural next step. For nearly two years, I have been tracking all intake (food broken into calories, macronutrients, fibre and sodium content) and expenditure and goals on a lovely Excel spreadsheet I created for this purpose. I've learned A LOT, and am still amazed at how effective this is for taking the guilt and mystery out of dieting . I don't really like the word "dieting" as it implies a temporary restriction....I see this as more of a lifestyle change (though that phrase seems to have become a popular euphamism for dieting). I plan to eat this way for the rest of my life, making healthy choices most of the time but not sacrificing taste and allowing the occasional unhealthy or calorific treat too. I don't want to live in a world without cookies!
My definition of health shapes the choices I make when it comes to diet, exercise, and lifestyle. Your definition may or may not be the same....it's a fairly subjective term. For me, it means making choices about foods that balance taste with calorie/ fat and sugar content, using more wholesome and unprocessed ingredients where possible, being cognizant of sodium levels and reducing as much as possible without sacrificing taste. It means riding my bike to work instead of driving or taking the bus (I gave up my car last year). It means not being afraid to sweat, trying to work extra exercise into my life instead of avoiding it like the plague, not smoking, getting plenty of sleep and drinking plenty of water. It means being honest with myself and with my loved ones, reducing stress where I can, living a life I can be proud of.
A lot has happened during this journey, not least of which I have lost over 100 lbs. I have a lot more to go before I reach my goal of being a healthy weight, but I am not in an all-fired rush to get there....I am losing at a slow steady rate and still learning new things about myself and about healthy living every day.
My passion is cooking. I love to create in the kitchen and wow people with my delectable creations. Before I decided to lose weight, I was a big fan of French cooking, and used a lot of butter, cream sauces, and other fatty ingredients, that admittedly I still love. I could never understand how French people were not all huge. I can see now that it has a lot to do with portion control....their rich foods combined with North American "more is better" sensibilities spells disaster for the waistline! I still indulge in a rich treat now and then, but the majority of the time I am working to create dishes that are healthy, calorie-conscious AND delicious. Some of my recipes are modifications of old favourites or others' recipes to make them lower in calories, some are completely new creations. Feedback is welcome!